How to Manage Multi-Country Payroll Formats
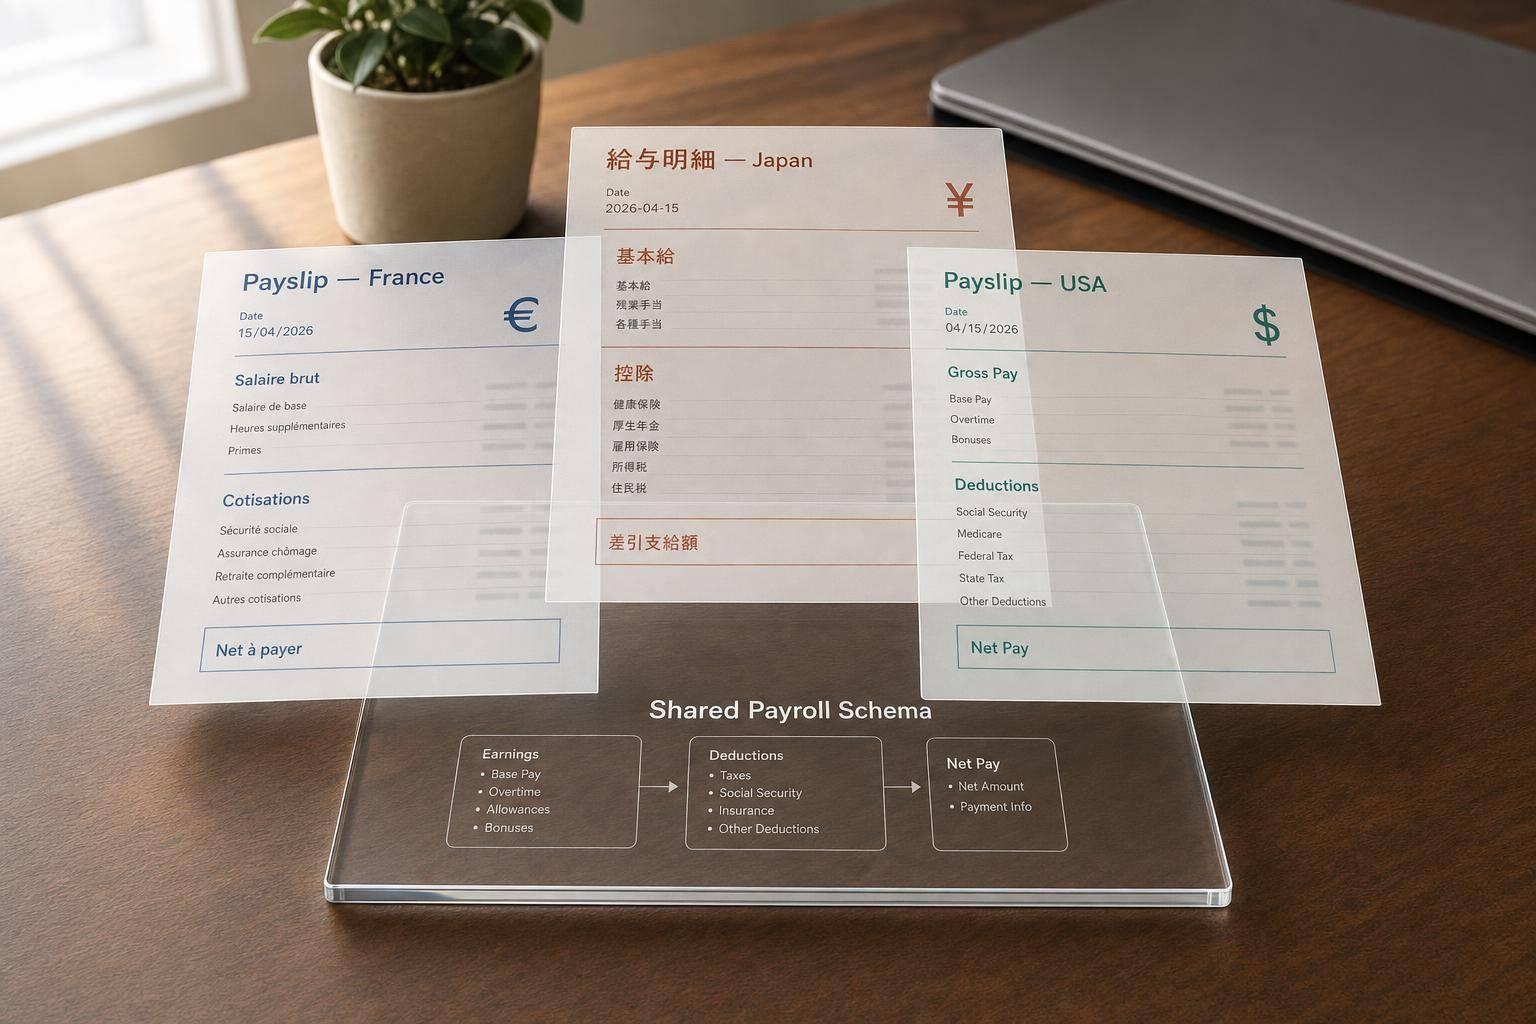
If I run payroll in more than one country, I need two things at the same time: one shared data structure and local payslip rules for each country.
A single template usually fails because countries change the fields, labels, language, date format, and retention rules. In the article, the fix is simple in concept:
- I list each country’s required payslip fields and legal labels
- I build one global payroll schema for shared data
- I map local fields into country templates
- I localize currency, dates, numbers, and language
- I test, version, publish, and review each format
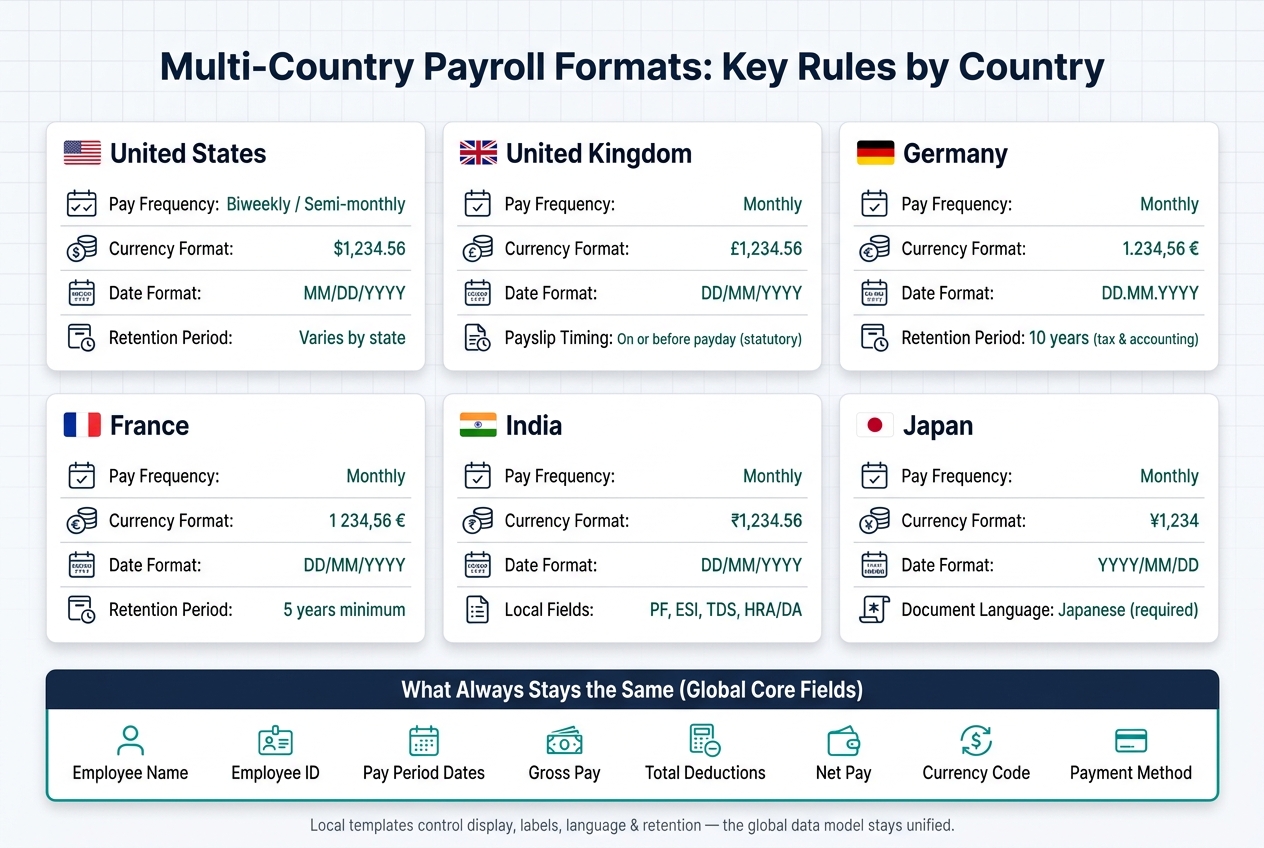
A few facts in the article show why this matters. The UK says payslips must be issued on or before payday. France keeps payslip duplicates for at least 5 years. Germany often follows a 10-year record retention standard tied to tax and accounting rules. Even the same net pay amount can look different across countries, such as $1,234.56 in the U.S. and 1.234,56 € in Germany.
My takeaway: I should not force every country into one layout. I should keep the payroll data model shared, then control each country’s display, legal wording, delivery, and archive rules through local templates and version control.
That’s the whole article in plain English.
1. Assess Country-Specific Payroll Format Requirements
Multi-Country Payroll Formats: Key Rules by Country
Before you build any payroll template, map the rules for each country. That means mandatory fields, exact labels, payday timing, and record retention. Start with what each country says must appear on the payslip.
Identify Mandatory Payroll Fields and Statutory Labels
Each country has its own payslip requirements, and the differences can be big. In most places, you’ll need at least:
- The employee’s name or identifier
- The employer’s legal name
- Pay period dates
- Gross earnings
- Individual deductions
- Net pay
Many countries also require year-to-date totals, leave balances, or legal statements that must appear in a set form.
A few examples show how far these rules can vary. Germany requires separate social insurance lines and payroll taxes. France requires a detailed payslip with a net social section. The Netherlands requires minimum-wage, contracted-hours, and employment-status details.
Don’t build around a generic global baseline. Build to the strictest local rule in each market. If one country requires a line-by-line overtime premium breakdown and another only asks for a gross total, your setup needs room for both. No shortcuts.
Labels matter just as much as the data itself. In some countries, payslips must be issued in the local official language. Some also require labels to match the exact terms used by tax or labor authorities. A field can be present and still be wrong if the wording doesn’t line up.
Once you’ve mapped the fields, move to the rules around timing, filing, and retention.
Document Local Payment, Reporting, and Recordkeeping Rules
You also need to document when payslips must be issued, how payroll data must be filed, and how long records must stay on file.
Pay frequency varies a lot by country. The US often uses biweekly or semi-monthly payroll. Germany, France, and India often use monthly payroll. The UK requires payslips to be provided on or before payday. Some countries also set firm deadlines for final pay or off-cycle payments, which can shape your payroll calendar in a big way.
Retention rules vary too. France requires payslip duplicates to be kept for at least 5 years, and Germany's tax and accounting rules drive a 10-year retention standard. That’s why some companies use a 10-year retention policy across Europe.
Keep a country-by-country requirements register that covers:
- Mandatory fields
- Required labels
- Pay cycles
- Filing formats
- Delivery rules
- Retention periods
Link each rule to its source. That register becomes the source of truth for every payroll template you build.
sbb-itb-b1c1928
2. Define a Global Payroll Data Structure
Turn country rules into one core payroll schema. That gives you a shared base for reporting, audits, and reconciliation. Then split the model into two parts: universal fields and local fields.
Separate Global Fields from Country-Specific Fields
Think of payroll data as a two-layer setup.
The global layer stores fields used across every country: employee name, employee ID, pay period start and end dates, base salary or hourly rate, overtime, bonuses, gross pay, total deductions, currency code, and payment method.
The local layer sits on top of that base. It holds fields that only matter in certain places, such as a U.S. Social Security Number, a UK National Insurance number, India's Provident Fund reference, or local social insurance breakdowns.
A shared core model makes consolidation, audits, and reporting line up across local payroll engines.
Use this setup to map local rules into one global model.
| Category | Global Fields (Universal) | Country-Specific Fields (Local) |
|---|---|---|
| Identity | Employee Name, Employee ID | SSN (US), NI Number (UK), PAN (India) |
| Timing | Pay Period Start/End, Payment Date | Local pay schedules |
| Earnings | Base Salary, Overtime, Bonus, Gross Pay | HRA/DA (India), Aguinaldo (Mexico) |
| Deductions | Total Deductions | FICA (US), PAYE (UK), Church Tax (Germany) |
| Workflow | Approval Status | - |
| Output | YTD Totals | Superannuation (AU), Professional Tax (India), EI/CPP (Canada) |
Country-specific fields should live in extension fields in your data model, not in the global core. That way, when you add a new country, you don't have to rebuild the whole structure. You just map local statutory fields into the setup you already use.
Standardize Naming, Codes, and Data Entry Rules
Messy labels make payroll reports hard to reconcile. If two countries tag the same payment in different ways, your global reporting gets messy fast. The answer is a controlled library of earning codes and deduction categories that each country maps to.
Define codes once and use them everywhere. For example, REG can mean regular pay, OT1 can mean standard overtime, and BONUS_DISCRETIONARY can mean a non-guaranteed incentive payment, no matter the local language or template format.
On the deduction side, use controlled categories and map local items like FICA in the US or PAYE in the UK into those buckets. Apply the same idea to approval status fields. Use one shared set - Draft, In Review, Approved, and Paid - across all countries so workflow dashboards and audit trails follow the same pattern.
Validation rules are what keep this from falling apart. Before any payslip is generated, your system should check that:
- required fields are filled in
- dates fall within the correct pay period
- currency codes are valid ISO values such as
USD,EUR, andGBP - deduction amounts do not exceed allowed limits
- each local field maps to a controlled global code
Use country-specific templates on top of the shared code library to automate the process.
With the core model fixed, map each country's fields into local template layouts.
3. Map Local Variations Into Country-Specific Templates
Once your global data structure is set, the next job is simple in theory but tricky in practice: turn that shared model into payslips and reports that fit each country.
Build Local Payslip and Reporting Templates from the Global Model
Start with the global field map from the previous section, then use it to build each local layout. For every country, map the same global data model into that country's payslip format. The payroll data itself does not change. What changes are the labels, the order of line items, and any legal statements that must appear.
That matters because local payslip formats can look very different, even when they describe the same payroll facts. The easiest way to handle this is to keep your main categories the same and swap in local labels and statutory lines where needed.
| Global Category | US Label | UK Label | India Label |
|---|---|---|---|
| Total Earned | Gross pay | Gross earnings | Gross salary |
| Income Tax | Federal/state income tax | Income tax (PAYE) | TDS |
| Social Insurance | FICA (SS + Medicare) | National Insurance | PF + ESI |
| Pension | 401(k) | Workplace pension | PF |
| Final Amount | Net pay | Net pay | Net salary / In-hand salary |
When you add a new country, use the same process each time:
- Collect local payslip requirements
- Map each global code to a local label and tax treatment
- Set the display order
- Review test payslips with a local payroll expert
Use Version Control and Delivery Workflows
After field mapping is done, lock down the template process so each country uses the right version and the right delivery path.
Each country template should have a version ID, an effective date range, and a change log that states what changed and why. For example: "Added CA Paid Sick Leave balance line per Jan 2025 state law change." If a template is replaced, it should be blocked for new payroll runs but still available for historical regeneration.
CleverSlip supports this kind of structured template management, with country-specific layouts, PDF snapshots, payslip history tracking, and delivery through self-service portals and email.
Keep template edits limited to approved admins. Route updates through payroll, legal, and local HR. Then test everything in a sandbox before publishing.
4. Configure Localization for Currency, Dates, Numbers, and Language
Set Format Rules for Money, Dates, Numbers, and Document Language
After you map local fields into country templates, or create country-specific payslips without templates, apply country-specific formatting rules at the output layer. Think of localization as the display layer. Keep the raw payroll values the same, then show them in the format each country expects.
A net pay value of 1234.56 might appear as $1,234.56 in the United States or 1.234,56 € in Germany. The number stays the same. Only the presentation changes.
Set up a country-specific formatting profile that covers currency symbol placement, thousand and decimal separators, decimal precision, date format, and document language. For en-US, that means:
- the dollar sign before the amount
- a comma for thousands
- a period for decimals
- two decimal places
- dates in MM/DD/YYYY format, such as 08/23/2026
For document language, separate labels from data completely. Store fields with neutral keys like gross_pay or employer_social_security, then use a translation dictionary to map each key to the right display label for each country. Your payroll engine stays the same. The rendering layer simply pulls the proper label set.
| Country | Currency | Date Format | Document Language |
|---|---|---|---|
| United States | USD / $1,234.56 | MM/DD/YYYY (08/23/2026) | English (US) |
| United Kingdom | GBP / £1,234.56 | DD/MM/YYYY (23/08/2026) | English (UK) |
| Germany | EUR / 1.234,56 € | DD.MM.YYYY (23.08.2026) | German |
| France | EUR / 1 234,56 € | DD/MM/YYYY (23/08/2026) | French |
| Brazil | BRL / R$ 1.234,56 | DD/MM/YYYY | Portuguese (Brazil) |
| Japan | JPY / ¥1,234 | YYYY/MM/DD (2026/08/23) | Japanese |
| Australia | AUD / $1,234.56 | DD/MM/YYYY | English (AU) |
When countries share the same symbol, like $ for both USD and AUD, use the ISO 4217 three-letter code in cross-country reports so no one has to guess which currency they’re looking at.
CleverSlip uses country-specific formatting profiles across every payslip it generates, without changing the underlying pay calculations.
With the format rules in place, the next job is to check how they appear in payroll output.
Verify Display and Legal Requirements
Split given names and family names, then let each country template decide the display order. That small detail matters more than people think.
Set address order by country too. A U.S. address block does not look like a German one, and forcing one format onto both usually creates messy output.
For legal display, many countries require certain items on payslips. These often include:
- employer legal name and registered address
- employee identifier
- pay period dates in the proper local format
- itemized earnings and deductions with statutory terminology
- cumulative year-to-date totals where required
Map each statutory item to the exact field and label the country requires, then confirm that the template shows it correctly. The data alone isn’t enough. The label also has to match local statutory wording.
Store time in a neutral unit, then display it as hours, days, or shifts based on the country template.
Once localization is set up, test every template output before publishing. For teams expanding further, follow our guide on how to configurer des fiches de paie pour un nouveau pays.
5. Validate, Publish, and Maintain Payroll Formats
After you localize the template, pause before launch and check the math, display, and archive controls.
Test Calculations and Template Outputs Before Go-Live
Once localization is set up, don’t publish yet. Start with a validation cycle. Payroll mistakes are expensive, and they’re much harder to clean up after release.
Run two or three parallel pay cycles before go-live, using the same inputs and timing as an actual production run. Check calculations layer by layer: gross pay by element, statutory deduction bases, contributions, net pay, and year-to-date totals. Then review the localized output and any required legal text.
Use this checklist before releasing payslips to any employee:
| Review Category | What to Check |
|---|---|
| Gross-to-Net Calculation | Base pay + overtime − deductions = correct net pay |
| Statutory Deductions | Federal/state income tax, FICA, benefits applied at correct rates |
| YTD Totals | Cumulative figures increase correctly from prior periods |
| Localized Display | Localized display matches the country profile |
| Mandatory Legal Fields | Employer ID or EIN, employee ID, pay period dates, itemized earnings and deductions |
| Local Expert Sign-Off | Someone with regional knowledge has reviewed and approved the template |
| Archive Check | Final PDF is stored in a centralized, searchable payslip history |
Before full release, run a small pilot in each country with HR staff or volunteers. This tends to catch usability problems that pure technical testing can miss. During the first one or two live pay cycles, stay in close-watch mode: review exception reports and answer employee questions fast. CleverSlip can generate test PDFs from each country template while keeping them separate from live data.
Maintain Version Control and Keep Formats Up to Date
After go-live, keep those same controls in place through versioned updates and scheduled reviews.
Validation isn’t the finish line. Template control needs to continue after release.
Each payroll template should have a unique version ID, an effective date, a list of affected countries, the reason for the change, and the names of approvers. If a tax law changes in one country, or California adds a new wage statement rule, you need a clean record of what changed, when it changed, and who approved it.
Set up three clear owners for maintenance:
- A compliance owner who tracks legal changes
- A payroll operations owner who updates templates
- An HR owner who keeps employee-facing language clear
These owners should meet quarterly for small updates and complete a full annual review. Named owners with clear jobs make local regulation far less of a scramble.
Schedule formal reviews at least once a year for every active country, and more often in places with frequent legislative change. Log every update in the version-controlled library so auditors can trace the template used for any pay period. CleverSlip's payslip history tracking and audit trail features make it easy to pull that record without manual searching when a compliance question comes up.
FAQs
How do I build one payroll schema that supports local payslip rules?
Use a template-based approach instead of forcing every team into the same document. Pick country-specific templates that include the fields each location requires, along with local tax withholdings and the right formatting rules.
That way, you can manage employees from one account and still stay compliant. The workflow stays the same on your side, while each payslip adjusts to local rules like currency symbols, date formats, and local deductions.
What should I localize besides currency and date formats?
Beyond currency and date format, U.S. payroll localization also comes down to what each jurisdiction says must appear on the payslip and how pay must be scheduled.
That means getting four things right at the same time:
- Who and what must be shown: employer name, employee name, and, in some places, the employer’s address, phone number, or identifying number
- When the pay applies: the pay period start date, pay period end date, and the pay date
- How pay is broken out: regular hours, overtime hours, rates of pay, gross wages, deductions, and net pay
- How often people must be paid: weekly, biweekly, semimonthly, or another state-approved cycle
Some states are very specific. Others mostly care that the employee gets a written wage statement with enough detail to understand the payment. And in the U.S., that state-level layer matters a lot.
What U.S. jurisdictions usually require on a payslip
A compliant U.S. payslip often includes the same core fields across states, even when the legal wording changes a bit:
- Employee name
- Employer name
- Pay period start and end dates
- Pay date
- Gross wages
- Net wages
- Itemized deductions
- Hours worked, when the worker is nonexempt
- Rate or rates of pay
- Regular and overtime earnings, when those apply
- Year-to-date amounts, where required or commonly expected
In practice, many employers also show:
- Employer address
- Employee ID or partial SSN
- Available paid sick leave or PTO balances, if state or local rules push employers to track that separately
- Taxable wages by tax type
- Year-to-date gross, taxes, deductions, and net
That’s the safe path. But “safe” isn’t always the same as “legally required,” and that’s where jurisdiction-by-jurisdiction localization comes in.
State-by-state differences in payslip content and structure
Some jurisdictions require a full itemized wage statement every pay period. Others focus more on timing and recordkeeping. A few even care about the form of the statement, such as whether it must be detachable, written, or easy to keep.
Here’s what payroll teams usually need to localize.
Employer and employee details
Many states require the employee’s name and the employer’s name on the payslip. Some go further and require the employer’s address.
California is a good example of a stricter format. Employers there generally need to show:
- Gross wages earned
- Total hours worked by most nonexempt employees
- Number of piece-rate units, if paid that way
- All deductions
- Net wages earned
- Inclusive dates of the pay period
- Employee name and either the last four digits of the SSN or an employee ID number
- Employer name and address
- All hourly rates in effect during the pay period and the corresponding number of hours worked at each rate
That last point matters. If a worker has regular time, overtime, double time, or shift-based rates, the payslip should break those out instead of rolling them into one blended line.
New York also requires detailed wage statements for many workers, including rate information and hours tied to those rates. In a setup like that, a clean breakdown of regular pay vs. overtime pay isn’t just nice to have. It’s part of showing how the wages were figured.
Pay period start and end dates, plus pay date
U.S. employees need to be able to tell what work period the pay covers and when the wages were paid.
That usually means listing:
- Pay period start date
- Pay period end date
- Pay date
This sounds simple, but it’s a common failure point. A payslip that only shows a pay date can leave the employee guessing which days the check covers. In stricter states, that can turn into a wage statement issue.
Date format should also follow U.S. convention. For example:
Pay Period: 03/01/2026 - 03/14/2026
Pay Date: 03/20/2026
Using the correct period dates also helps with overtime review, paid leave tracking, and final pay checks.
Mandatory earnings and deduction lines
Most states expect enough line-item detail for an employee to understand how gross pay turned into net pay.
That often includes earnings lines such as:
- Regular hours and regular pay
- Overtime hours and overtime pay
- Double time, where used
- Salary earnings
- Bonus or commission lines
- Piece-rate earnings, if used
- Paid leave earnings, if paid during the period
And deduction lines such as:
- Federal income tax withholding
- Social Security tax
- Medicare tax
- State income tax, where applicable
- Local income tax, where applicable
- Employee-paid benefits
- Garnishments or other withholdings
Some states are stricter about itemization than others. California, again, is one of the clearest examples: deductions must be shown, and the rates and hours tied to hourly work must also be shown.
Year-to-date totals
Not every jurisdiction expressly requires year-to-date figures on the wage statement, but many employers include them because they help workers verify withholding and track earnings across the year.
Where year-to-date amounts are required by law, policy, or strong practice expectations, they may include:
- Year-to-date gross pay
- Year-to-date net pay
- Year-to-date taxes withheld
- Year-to-date benefit deductions
- Year-to-date hours
Even when not strictly required, leaving out YTD figures can create friction for employees and payroll support teams. People use these numbers all the time to check taxes, benefit deductions, and income for loans or rental applications.
Pay item breakdowns: regular vs. overtime
This is one of the most important pieces of U.S. payroll localization.
If a nonexempt employee worked 80 regular hours and 6 overtime hours, the payslip should not bury that in one gross number. It should show the pay items separately, with the hours and rates tied to each line where required.
A properly localized breakdown might look like this:
| Pay Item | Hours | Rate | Amount |
|---|---|---|---|
| Regular | 80.00 | $25.00 | $2,000.00 |
| Overtime | 6.00 | $37.50 | $225.00 |
| Gross Pay | $2,225.00 |
That level of detail matters most in states that require hourly rates and corresponding hours on the wage statement. It also helps defend wage-and-hour calculations if there’s a dispute later.
For salaried exempt workers, the statement may be less hour-driven, though employers still need to meet any state itemization rules that apply.
Correct pay frequency by jurisdiction
Pay frequency is another area where U.S. rules split by state. There is no single national rule that covers all private employers in the same way.
Some states allow broad flexibility. Others require certain worker groups to be paid weekly, semimonthly, or on another set cycle. In some places, manual workers are treated differently from office staff.
A payroll setup has to match the local rule on how often wages must be paid, not just what appears on the payslip.
Here are the common pay frequencies used in the U.S.:
- Weekly
- Biweekly
- Semimonthly
- Monthly in limited cases, often depending on worker type or state rule
For example, one state may allow semimonthly payroll for many employees, while another may require more frequent pay for hourly workers. That means the payslip localization work can’t be separated from payroll schedule design.
What “structured correctly” looks like in practice
A U.S.-localized payslip should be easy to read and should tie each number back to a clear pay element. In plain terms, the employee should be able to answer:
- Who paid me?
- What dates does this pay cover?
- How many hours did I work?
- Which hours were regular, overtime, or another category?
- What rate was used?
- What was deducted?
- What did I take home?
A common U.S. structure looks like this:
| Section | What it should show |
|---|---|
| Employer/Employee Info | Employer name, employer address if required, employee name, employee ID or last four digits of SSN if required |
| Pay Period Info | Pay period start date, pay period end date, pay date |
| Earnings | Regular, overtime, salary, bonus, commission, leave pay, hours and rates where required |
| Deductions | Taxes, benefits, garnishments, other withholdings |
| Totals | Gross pay, net pay, and YTD totals where required or expected |
That structure won’t satisfy every state by itself, but it gives you the right framework. From there, each jurisdiction may add its own twist on rate disclosure, hours disclosure, employer details, or timing rules.
Why this needs jurisdiction-level localization
A payslip that works in one state may fall short in another. That’s the heart of U.S. payroll localization.
California may demand a highly itemized wage statement with dates, rates, hours, employer address, and employee identifying details. Another state may focus less on the statement layout but still set tight rules on pay frequency or wage payment timing. New York may require rate-and-hour detail that pushes you to separate lines more clearly.
So if you’re localizing U.S. payroll, don’t stop at $1,250.00 and MM/DD/YYYY. You also need to localize:
- The required fields
- The line-item structure
- The **rate
How often should I review and update country payroll templates?
Review each country’s payroll template any time local rules or payroll needs change. Do the same during initial setup and at each rollout.
Before you send anything out, check the template against local rules with a sample payslip and a local review. That includes currency formatting and pay-frequency settings.
Also keep deductions and required fields up to date so payslips remain compliant.
Payroll, simplified
Create structured payslip PDFs in minutes.
Build country-specific payslip documents, deliver them instantly, and keep a searchable history for audits and employee requests.
Start free