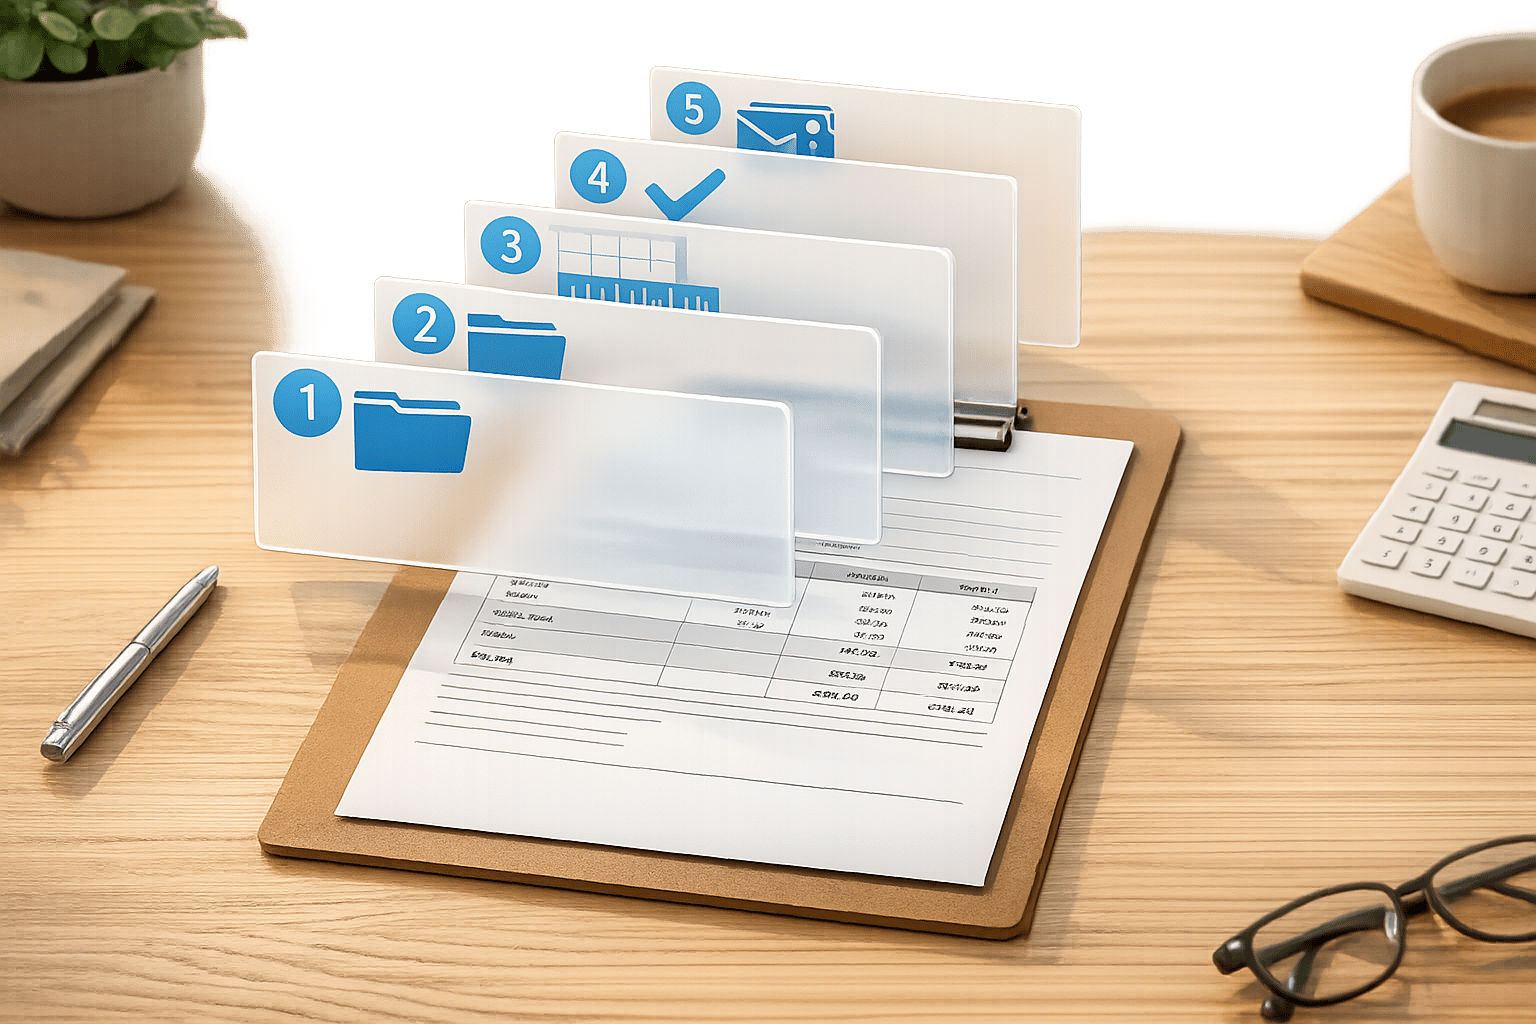
How to Create Professional Payslips in 5 Easy Steps
Creating professional payslips doesn't have to be complicated. Here's a quick breakdown of the process:
- Gather Employee and Payment Details: Collect key information like employee names, addresses, pay periods, hours worked, and deductions (e.g., taxes, benefits).
- Choose a Template or Payroll Software: Use tools like CleverSlip for ready-to-use templates and automated tax calculations.
- Enter Payroll Data: Input details such as hours worked, gross pay, deductions, and net pay. Double-check for accuracy to avoid compliance issues.
- Format and Customize Payslips: Add your company logo, organize details clearly, and ensure compliance with U.S. formatting rules (e.g., MM/DD/YYYY dates, $ amounts).
- Review and Send Payslips: Verify calculations, preview for errors, and securely distribute payslips via email, employee portals, or printed copies.
Accurate payslips are essential for compliance, avoiding penalties, and building trust with employees. Using payroll software like CleverSlip simplifies the process by automating calculations and ensuring all legal requirements are met.
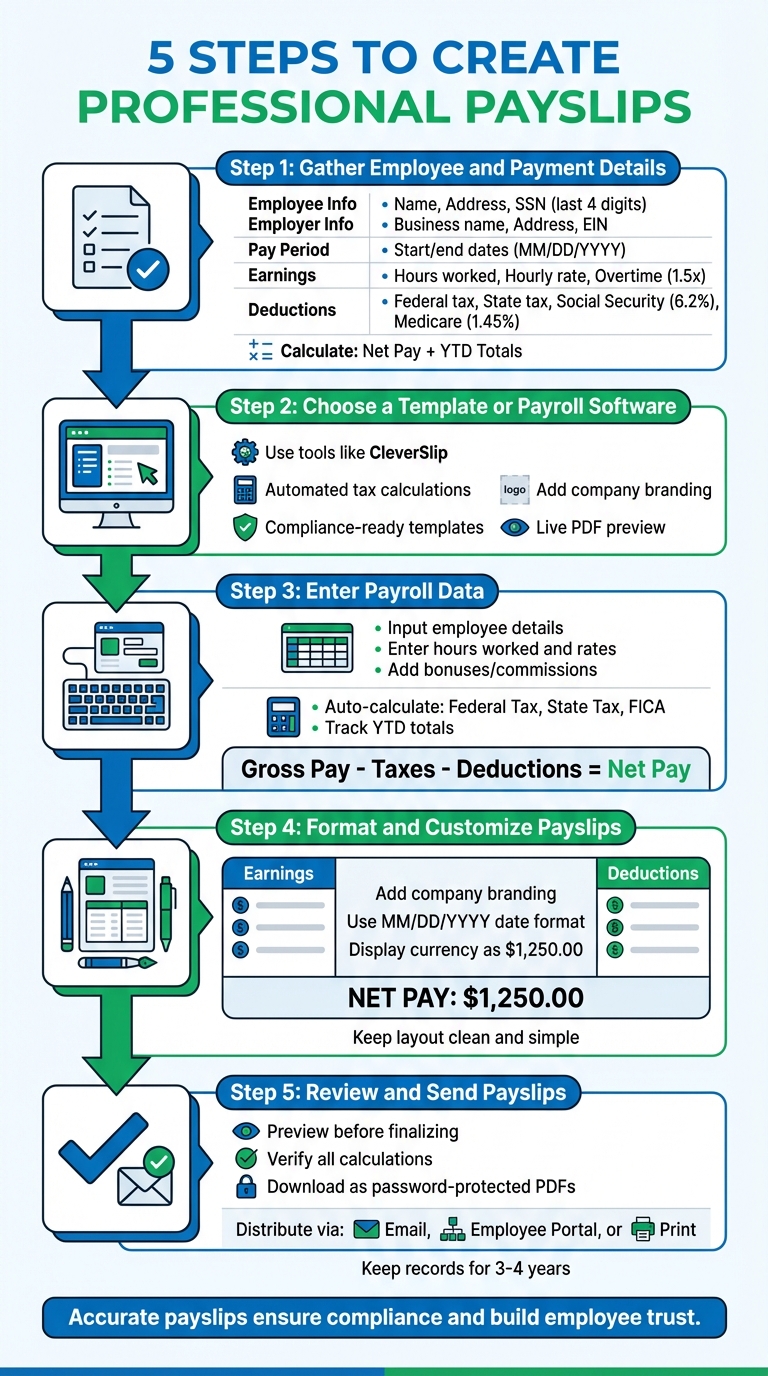
5 Steps to Create Professional Payslips
Creating a Salary Slip / Payslip in Excel | Step-by-Step Payroll Tutorial
Step 1: Collect Employee and Payment Details
Before you can create a payslip, you need to gather all the necessary information. Missing even a small detail could lead to compliance issues or confusion down the line.
Start by collecting employee identification details. This includes the employee's full name, home address, and either an employee ID or the last four digits of their Social Security Number (SSN). Avoid using the full SSN to reduce the risk of identity theft.
Next, gather the employer's information. This should include the legal business name (not a DBA), the business address, and the Employer Identification Number (EIN). The EIN is critical since it’s the federal tax identifier for the business.
Then, document the pay period details. Note the start and end dates of the pay period in MM/DD/YYYY format, as well as the actual payment date.
When it comes to earnings, record the total hours worked, separating regular hours from overtime. Include the hourly rate or salary and any bonuses. Make sure overtime is calculated correctly at 1.5 times the regular hourly rate - this helps avoid potential wage disputes.
For deductions, list all withholdings in detail. This includes federal income tax, state income tax, Social Security (6.2% on wages up to $176,100 for 2025), and Medicare (1.45% on all wages, plus an additional 0.9% on wages over $200,000). Don’t forget to include deductions for health insurance, retirement contributions, and any wage garnishments.
Once you’ve gathered all this information, calculate the net pay (take-home pay after deductions). Also, include year-to-date (YTD) totals for earnings, deductions, and net pay. These YTD figures are important for tracking tax obligations and can be useful for employees when applying for loans or verifying income.
Lastly, make sure to keep copies of all payslips for at least three to four years. This is crucial for audits and resolving any disputes that may arise.
With these details in hand, you’re ready to move on to Step 2: choosing a template or payroll software.
Step 2: Select a Template or Software Tool
Once you've gathered all the necessary employee and payment details, the next step is choosing a tool to create compliant payslips. CleverSlip offers templates specifically designed for the U.S., preloaded with fields required by both federal and state regulations. This makes the transition from collecting data to generating payslips seamless and efficient.
These templates handle automated tax calculations based on the latest IRS tables, covering federal income tax, Social Security (6.2%), and Medicare (1.45%). This feature minimizes the risk of manual errors and ensures everything aligns with federal tax rules. For states with specific payroll requirements, CleverSlip includes the necessary fields. For instance, in California, payslips must show the period earned for retroactive payments.
You can also personalize payslips by adding your logo, business name, and contact information, keeping your branding consistent. The live PDF preview feature allows you to see how the payslip looks before finalizing, helping you catch any formatting or detail issues early on. Employee-specific fields include options for their full name, address, employee ID, and the last four digits of their SSN for added security. After setting up your template, review the available pricing plans to find the best fit for your business needs.
CleverSlip Pricing Plans
Your choice of plan depends on the size of your business and the complexity of your payroll needs. Here's a breakdown of the available options:
| Plan | Monthly Cost | Employees | Payslips | Key Features |
|---|---|---|---|---|
| Free | $0 | Up to 10 | 50/month | 1 country template, PDF download, duplicate payslips |
| Starter | $9 | Up to 25 | Unlimited | All country templates, email delivery, CSV export, dashboard analytics, employee self-service portal |
| Pro | $29 | Unlimited | Unlimited | Everything in Starter, bulk generation, ZIP download, YTD totals on PDFs, company branding, priority support |
| Business | $79 | Unlimited | Unlimited | Everything in Pro, API access, webhooks, audit trail, dedicated account manager |
The Free plan is perfect for sole proprietors or small teams just starting out. If your team is growing and you need to send payslips via email, the Starter plan offers unlimited payslips and access to all country-specific templates. For businesses looking to incorporate branding and generate payslips in bulk, the Pro plan is a great choice. Larger organizations needing advanced features like API integration and audit trails will benefit from the Business plan, which also includes a dedicated account manager for personalized support.
Once you've selected a tool and plan, you're ready to move on to entering payroll data in Step 3.
Step 3: Enter Payroll Data
Once you've chosen your template and plan, it's time to input your payroll data into CleverSlip's dashboard. Getting this step right is crucial - small mistakes can lead to issues like incorrect tax withholdings, compliance violations, or underpayments. For example, in fiscal year 2025, the U.S. Department of Labor recovered over $184 million in back wages for nearly 146,000 workers due to FLSA violations, with overtime underpayments alone accounting for $146 million. So, accuracy here isn't just important - it's essential.
Start by entering employee identification details: full name, current address, and Social Security Number (only the last four digits are displayed for security purposes). Next, input your employer information, such as the company name, business address, and Employer Identification Number (EIN). Then, set the pay period details, including the start and end dates of the work period, the pay date, and the pay frequency (weekly, bi-weekly, or monthly).
For hourly employees, input the total regular hours worked, the hourly rate, and any overtime hours (calculated at 1.5 times the regular rate under the FLSA). For salaried employees, divide the annual salary evenly across the pay periods. Don’t forget to include any bonuses, commissions, or allowances.
CleverSlip handles statutory deductions automatically, including:
- Federal Income Tax, based on the employee's W-4 form
- State Income Tax, if applicable
- FICA taxes, which include Social Security (6.2% up to a $176,100 cap for 2025) and Medicare (1.45%)
Make sure to input both pre-tax and post-tax deductions. Pre-tax deductions, like traditional 401(k) contributions and health insurance premiums, lower taxable income. Post-tax deductions, such as Roth 401(k) contributions or wage garnishments for child support, are applied after taxes. CleverSlip also tracks Year-to-Date (YTD) totals for gross pay, taxes, and deductions from January 1 through the current pay period.
Double-check all entries to avoid errors. Even small mistakes, like confusing "0" with "O" or missing a decimal point, can cause significant problems and invalidate a payslip.
"Gross Pay - Taxes - Deductions = Net Pay (Take-Home Pay). That single formula is the thread running through every pay stub you will ever receive." - David Harding, Founder, Invoice Data Extraction
Take your time to review everything carefully before moving on to the next step.
sbb-itb-b1c1928
Step 4: Format and Customize Payslips
After entering payroll data, the next step is to format your payslips to ensure they look professional and meet compliance standards. CleverSlip's tools make it easy to add your company branding and follow US formatting guidelines, so your employees receive clear, accurate information.
Start by adding your company logo, along with your company name, business address, and Employer Identification Number (EIN). Include the pay period and payment dates in the MM/DD/YYYY format. This not only reinforces your brand but also provides employees with critical contact details. Once the basics are in place, focus on organizing the layout.
Structure the payslip into clear sections. A common approach in the US is to use a two-column format. On the left, list earnings like regular pay, overtime, and bonuses. On the right, include deductions such as federal and state taxes, FICA (Social Security and Medicare), health insurance, and 401(k) contributions. This layout makes it easy for employees to compare their gross pay with deductions. Adding a Year-to-Date (YTD) column next to the current amounts can also help employees track their tax and benefit contributions over time.
Follow US formatting conventions for all numerical values. For example, display currency amounts like $1,250.00 and use the MM/DD/YYYY format for dates. Round numbers to two decimal places to maintain accuracy, and use standard abbreviations like FIT (Federal Income Tax) and SIT (State Income Tax). To highlight the net pay, use bold text or a slightly larger font size so it stands out clearly.
"Managing payroll efficiently is a critical task for businesses of all sizes. One of the key elements of this process is providing employees with clear and accurate payslips." - Ashley Taylor, Product Manager at Cleverence
Lastly, keep the layout clean and simple. Hide line items with $0.00 values to avoid unnecessary clutter, and leave enough white space to make the document easy to read. Use consistent labels - like "Gross Pay" instead of alternating terms - to maintain clarity from one pay period to the next.
Once your payslip is formatted and customized, you’ll be ready to move on to Step 5: creating, reviewing, and sending them.
Step 5: Create, Check, and Send Payslips
After entering all the necessary data, head over to the Create/Send Payslips menu and choose Download Payslip PDF for Multiple Employees. You can either pick employees one by one or use the Select By filter to group them by department, pay grade, or other criteria. This makes managing payslips for specific groups much simpler.
Before downloading, preview the multi-page document to ensure everything looks right. Check for formatting issues and confirm that all calculations are accurate. Pay close attention to earnings, deductions, and statutory requirements. Double-check that Gross Pay minus Total Deductions equals Net Pay and review Year-to-Date totals to spot any lingering errors from previous pay periods.
"Verifying your paystub isn't just a one-time task - it's a habit that helps protect your finances, ensure accurate tax reporting, and catch costly errors before they snowball." - FormPros
Once you're confident everything is correct, select Download a ZIP file containing separate employee PDFs to create individual payslips for each employee in one go. Make sure to enable Password Protect before downloading. Employee passwords should already be set up in the HR section of CleverSlip, ensuring that each file remains secure. The ZIP file will automatically save to your downloads folder, ready for the next step.
Now it's time to distribute the payslips. You can email them directly from CleverSlip, upload them to the employee self-service portal, or print hard copies for delivery. For emails, use a professional business email domain and apply password protection to maintain confidentiality. Notify employees promptly once their payslips are ready. This step wraps up your payroll process and ensures that payslips are distributed securely and efficiently.
Conclusion
To wrap things up, following these five steps - gathering employee details, choosing the right tool, entering payroll data, customizing the format, and securely distributing payslips - ensures your payroll process stays compliant and runs smoothly. Federal law mandates that employers keep detailed payroll records for at least three years, and many states have additional requirements for wage statements.
CleverSlip simplifies payroll by automating tax calculations for federal, state, Social Security, and Medicare, reducing errors and reinforcing accuracy throughout the process. With professional templates, bulk generation options, and secure email delivery, it saves time while ensuring you meet compliance standards.
"Automated payroll software offers the easiest, most streamlined way to create a payslip... this option will pay off in time savings and reduced errors." - Brooke Kunz, Business.org
Whether you're a new business or managing a large workforce, CleverSlip grows with you, adapting to your needs. A dependable payroll system doesn’t just save time - it boosts operational efficiency and helps build trust and confidence among employees.
FAQs
What info must a U.S. payslip include?
A proper U.S. payslip must contain key details, including: employee identification (such as the name and either the last four digits of the Social Security Number or an Employee ID), employer information (business name and address), pay period dates, pay date, and a clear breakdown of earnings and deductions (gross pay, taxes, and net pay). In some states, additional information like hours worked and pay rate may also be mandatory.
How do I handle pre-tax vs post-tax deductions on a payslip?
Pre-tax deductions - like contributions to a 401(k) or health insurance premiums - are taken out of an employee's gross pay before taxes are applied. This lowers taxable income, which in turn reduces the amount of tax withheld. On the other hand, post-tax deductions - such as wage garnishments or extra insurance premiums - are subtracted after taxes have been calculated.
To maintain clarity and compliance, it's important to clearly list these deductions on the payslip. Separating pre-tax and post-tax amounts helps ensure employees understand their pay breakdown.
How can I send payslips securely to employees?
When it comes to sending payslips securely, digital tools are your best friend. They let you download, print, or email payslips while keeping sensitive employee information safe. Use secure email services or encrypt attachments to add an extra layer of protection. Generating payslips in PDF format and sticking to secure email protocols helps maintain confidentiality and ensures compliance with privacy regulations.
Payroll, simplified
Create structured payslip PDFs in minutes.
Build country-specific payslip documents, deliver them instantly, and keep a searchable history for audits and employee requests.
Start free